Below is the process we follow for setup of our travel trailer at sites that don’t have a sewer connection. As a disclaimer we take no responsibility for you using this article as an excuse to run over your partner that’s helping you back in to your site, because you didn’t understand a hand signal or command. So be sure to use common sense and refer to the necessary manuals when moving, hooking/unhooking or setting up your camper.
The high level process goes something like the list below. Steps in detail have been provided as well.
- Positioning the Travel Trailer
- Leveling Trailer Side-to-Side
- Chock Wheels
- Connect Power Cord
- Get Hot Water Heater Going
- Leveling Trailer Front to Rear
- Deploy Stabilizers
- Deploy Slideout
- Connect Water Supply
- Begin with your Outside Setup
We’ve also provided a list of the equipment that we have found to make our life easier during setup, and also referenced in this write up at the bottom of this post.
Positioning the Travel Trailer on Campsite
Backing up the travel trailer is an important, and from what we know, a point of potential conflict for most couples/families. To get around this, we have come up with a simple solution.
- Park the tow vehicle and camper in front of your campsite entrance
- Get out of the vehicle and survey the site
- Identify locations of the following items:
- Electrical Connection
- Water Connection
- Picnic Table
- Fire Ring
- Charcoal Grill
- Any overhead hazards (low branches)
- Estimate distances from each of the items below with your travel trailer’s connection points by estimating with walking
- The purpose of this step is to make sure you have enough water hose/long enough power connection for where you intend to park the camper
- Stand with your back next to electrical connection or water connection point (whichever is closer to where the camper will be parked)
- Extend your arm, and take about 2-4 steps (heel to toe) and mark the location on the ground by dragging your foot
- This will be the closest point you want your tires so the slideout can fully extend
- Have your wife/partner call you via cell phone (because we’re too cheap for walkie talkies) and utilize the car’s bluetooth connection
- Slowly back up the camper in to position using clear, simple verbal directions. We utilize the following scheme:
- Come on back = back it up
- Towards Driver Side = move back end of the camper towards the driver’s seat (aka turn wheel clockwise)
- Towards Passenger Side = move back end of the trailer towards the passenger seat (aka turn wheel counterclockwise)
- Stop = Stop
- What we’ve found that doesn’t work:
- “Come back the other way”
- “Turn it this way”, generally followed by a hand gesture
- Standing outside of the range of the mirrors
- What we’ve found that doesn’t work:
- Exit tow vehicle and double check positioning prior to leveling the trailer
Leveling Travel Trailer Side-to-Side
- Use 24″ level on side of trailer wall to identify which side needs to be raised
- If leveling is needed perform the following:
- Place Anderson Levelers under wheels
- Instruct wife/partner to pull trailer forward slowly, until level
- Note: you may have to hold the camper in position until it stops bouncing to get an accurate read on the level bubble
- Chock Anderson Leveling Blocks per instructions
- Place tow vehicle in Park
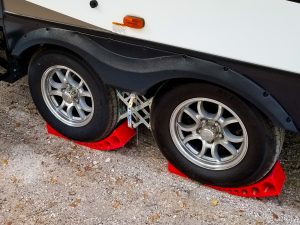
Chock Wheels
- Chock Electric Side Wheels using standard wheel chocks (if Andersen Levelers were not deployed)
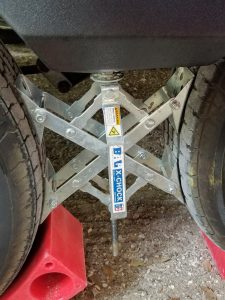
- Deploy X-Chocks on Electric Side
- Tip: It’s easier to deploy the X-Chock before extending the slideout. It prevents you from crawling underneath the slide.
- Deploy X-Chock on Awning Side
Connect Power Cord
- Disconnect trailer harness from tow vehicle
- Verify breaker (30A/50A) is in the OFF position
- Connect power cord to pedestal and camper
- Turn breaker to ON position on power pedestal
- Tip: This allows you to get the A/C going, and also saves on propane if you’ve been traveling with your fridge on.
Get Hot Water Heater Going (optional at this point)
We like to have hot water going as soon as we arrive on site, because camping in Florida is often hot setting up, and taking a nice shower when we’re done setting up is always a great way to re-energize for the evening.
- Turn on the water pump to allow the hot water tank to fill (assuming you emptied it on your last trip)
- Tip: Always begin each trip with about 10 gallons of water in the tank to allow for priming the water heater while setting up, and those occassional bathroom stops on the way to your camping destination.
- Once water pump shuts off, open hot water faucets to ensure lines are free of air
- Shut hot water faucets
- Turn on hot water heater (Gas and Electric for accelerated heating)
- Turn off water pump
Leveling Travel Trailer Front to Rear
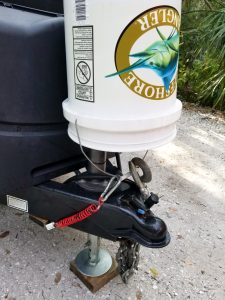
- Disconnect trailer from tow vehicle
- Tip: be sure to take a glance at your site, if it is pitched front to rear to an extreme, be sure to adjust the foot on your power jack appropriately to allow for the proper amount of adjustment. In some instances I have only been able to move my jack foot down one notch for severely pitched sites.
- Due to the variety of weight distribution hitches, we’ll refer you to your particular manufacturer for specific instructions to complete
- Tip: Utilize a 5 Gallon bucket to cover your power tongue jack. This protects from sun damage, as well gives you a place to put your safety chains off the ground.
- Pull tow vehicle out of the way
- Place level on an interior surface
- Adjust tongue up/down until level bubble reads center
- We use the front passthrough storage floor for the initial leveling, and then double check it just inside the entry door for a second checkpoint
- Tip: Once level, I generally raise my tongue jack about 1-2 seconds to allow the A/C water to run off the back of the trailer, instead of the front.
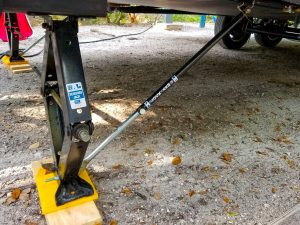
Deploy Stabilizers
- Using Jack Pad and Drill w/ 3/4″ attachment (and wood if required) lower and secure your stabilizers in the following order:
- Tip: Utilize the 3/4 wrench that came with your X-Chocks to loosen and secure the BAL stabilizer arms
- Front, Electric Side
- Front, Awning Side
- Rear, Awning Side
- Rear, Electric Side
- Tip: Utilize the 3/4 wrench that came with your X-Chocks to loosen and secure the BAL stabilizer arms
Deploy Slideout
- Utilize partner on inside of camper to extend slideout while you observe slide deployment
- Watch for obstructions to slideout extension
Setup Water Supply
- Connect Water Pressure Regulator to Campground Supply Outlet
- Connect Y-Adapter to Water Pressure Regulator

Water Supply Connection - Ensure water selection is in City Water mode
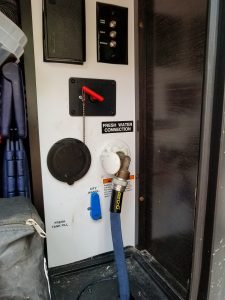
- Connect 90 degree elbow fitting at water connection port
90 Degree Elbow - Connect Water Filter to Y-Adapter
- Turn on water supply until water runs clear through water filter
- Turn off water supply
- Connect water hose to filter
- Tip: ensure no kinks exist in hose prior to beginning next step
- Turn on water supply until water runs clear through hose
- Turn off water supply
- Connect water hose to 90 degree elbow at water connection port
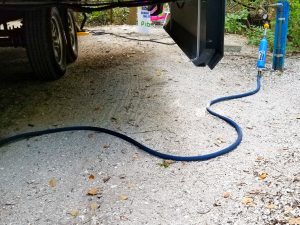
- Tip: run your water hose under the camper/slideout as much as possible to shade the hose from the sun. This will help reduce that spirt of hot water when you first turn on the cold faucet during summer time camping
Water Hose Routing
- Tip: run your water hose under the camper/slideout as much as possible to shade the hose from the sun. This will help reduce that spirt of hot water when you first turn on the cold faucet during summer time camping
- Turn on water supply and verify pressure on regulator
- Tip: if water pressure reads “Good” but pressure is poor inside the camper, you may need to replace your water filter
Begin with your Outside Setup
Future write up to come on what we bring for our typical outdoor setup items, and where we go from there.
List of Items Referenced in Setup
- Andersen Camper Leveler
- X-Chocks
- BAL Stabilizer Jacks
- BAL Stabilizer Lock-Arm Stabilizer
- Water Pressure Regulator
- Water Hose Y-Adapter
- 90 Degree Elbow
- Water Filter
- Water Hose
- 3/4 Inch Drill Adapter